Cricut® Stencils & Sponging Technique
Just over a week ago, we released our latest idea book—Seasonal Expressions 2! If you haven’t checked it out yet, you can look through an online version or even download it as a PDF here. We know you’ll love it!
One of the paper collections in this idea book is called Little Dreamer, and it’s all about unicorns, magic, and dreams…which got us thinking about a certain sponging technique we love that adds a dream-like magic to all your artwork. Since it is so perfect for this collection, we just had to share it with you!
In a nutshell, here’s the technique: Use titles or shapes cut with your Cricut® machine or with Thin Cuts metal dies as stencils for sponging ink onto your pages.

First, use a bit of adhesive to attach your title or shape to the page. Next use a sponge dauber or the round sponge to add ink over your title or shape, and then fade the ink into your paper. Once the ink is dry, carefully remove your stencil (if there is any adhesive residue, it’s a cinch to remove with our Rub & Remove™ eraser).
For our artwork, we found it worked best to use both the round sponge and sponge daubers. We used a sponge dauber for a more concentrated look, like you can see immediately around our title, and then the round sponge for fading the ink into the page.

This stenciling technique is a great way to create unique backgrounds for your artwork. For this page, we attached three clouds to the page and sponged around them. After allowing the ink to dry, carefully removing the clouds, and removing any adhesive, we cut three more clouds and sponged around the edges. Then we popped them up with 3-D tape to give the page dimension. The final look sure is dreamy!

You can incorporate multiple colors into your stenciling! Here we used a scalloped piece for our stencil, and then sponged on a rainbow of colors. There are SO many possibilities!
We hope this post has inspired you to try stenciling on your artwork. It really is such a fun way to get in touch with your inner artist!
Which page is your favorite? Tell us in the comments below!
Recipes
12″ x 12″ You Make the World Sweet Page
Z3334 Little Dreamer Scrapbooking Stamp + Thin Cuts, X7219B Little Dreamer Paper Packet, 1385 White Daisy Cardstock, Z2841 Glacier Exclusive Inks™ Stamp Pad, Z2895 Lagoon Exclusive Inks™ Stamp Pad, Z2896 Smoothie Exclusive Inks™ Stamp Pad, X7219C Little Dreamer Complements, Z3321 Little Dreamer Glitter Gems, Z3132 Watercolor Paints, Z697 Round Sponge, Z726 Sponge Daubers, Z3167 Cricut® Artistry Collection
Cricut® Shape:
Artistry
1″ Shift+Background <K> (p. 28)
12″ x 12″ Find Your Rainbow Page
Z3334 Little Dreamer Scrapbooking Stamp + Thin Cuts, X7219B Little Dreamer Paper Packet, 1385 White Daisy Cardstock, Z2841 Glacier Exclusive Inks™ Stamp Pad, Z2895 Lagoon Exclusive Inks™ Stamp Pad, Z2840 Thistle Exclusive Inks™ Stamp Pad, Z2896 Smoothie Exclusive Inks™ Stamp Pad, Z2843 Canary Exclusive Inks™ Stamp Pad, X7219C Little Dreamer Complements, Z3274 Clear Sparkles, Z1263 Bitty Sparkles, Z697 Round Sponge, Z726 Sponge Daubers, Z3167 Cricut® Artistry Collection, Thread, Sewing Machine
Cricut® Shapes:
Artistry
1 ½” and 1 ¾” Icon-2 <Spring> (p. 38)
1 ½” and 1 ¾” Shift+Icon-2 <Spring> (p. 38)
12″ x 12″ Believe in Yourself Page
X7219B Little Dreamer Paper Packet, 1385 White Daisy Cardstock, Z2853 Sweet Leaf Exclusive Inks™ Stamp Pad, Z2843 Canary Exclusive Inks™ Stamp Pad, Z2864 Sorbet Exclusive Inks™ Stamp Pad, Z2896 Smoothie Exclusive Inks™ Stamp Pad, Z2840 Thistle Exclusive Inks™ Stamp Pad, Z2895 Lagoon Exclusive Inks™ Stamp Pad, Z2841 Glacier Exclusive Inks™ Stamp Pad, X7219C Little Dreamer Glitter Gems, Z3189 White & Gold Ribbon, Z697 Round Sponge, Z726 Sponge Daubers, Z3169 Cricut® Artbooking Collection
Cricut® Shape:
Artbooking
8″ Shift+Photo Mat 1 <S> (p. 59)
One of the paper collections in this idea book is called Little Dreamer, and it’s all about unicorns, magic, and dreams…which got us thinking about a certain sponging technique we love that adds a dream-like magic to all your artwork. Since it is so perfect for this collection, we just had to share it with you!
In a nutshell, here’s the technique: Use titles or shapes cut with your Cricut® machine or with Thin Cuts metal dies as stencils for sponging ink onto your pages.

First, use a bit of adhesive to attach your title or shape to the page. Next use a sponge dauber or the round sponge to add ink over your title or shape, and then fade the ink into your paper. Once the ink is dry, carefully remove your stencil (if there is any adhesive residue, it’s a cinch to remove with our Rub & Remove™ eraser).
For our artwork, we found it worked best to use both the round sponge and sponge daubers. We used a sponge dauber for a more concentrated look, like you can see immediately around our title, and then the round sponge for fading the ink into the page.
Sponging Tip: If you haven’t used a
round sponge before, you’ll want to cut out a pie-shaped wedge from the
sponge rather than using the entire sponge. That way your sponging will
be more precise, and you can get more use out of your sponge!
We recommend playing with the round sponge and sponge daubers, as
well as various amounts of ink, on some scratch paper before sponging
onto your artwork.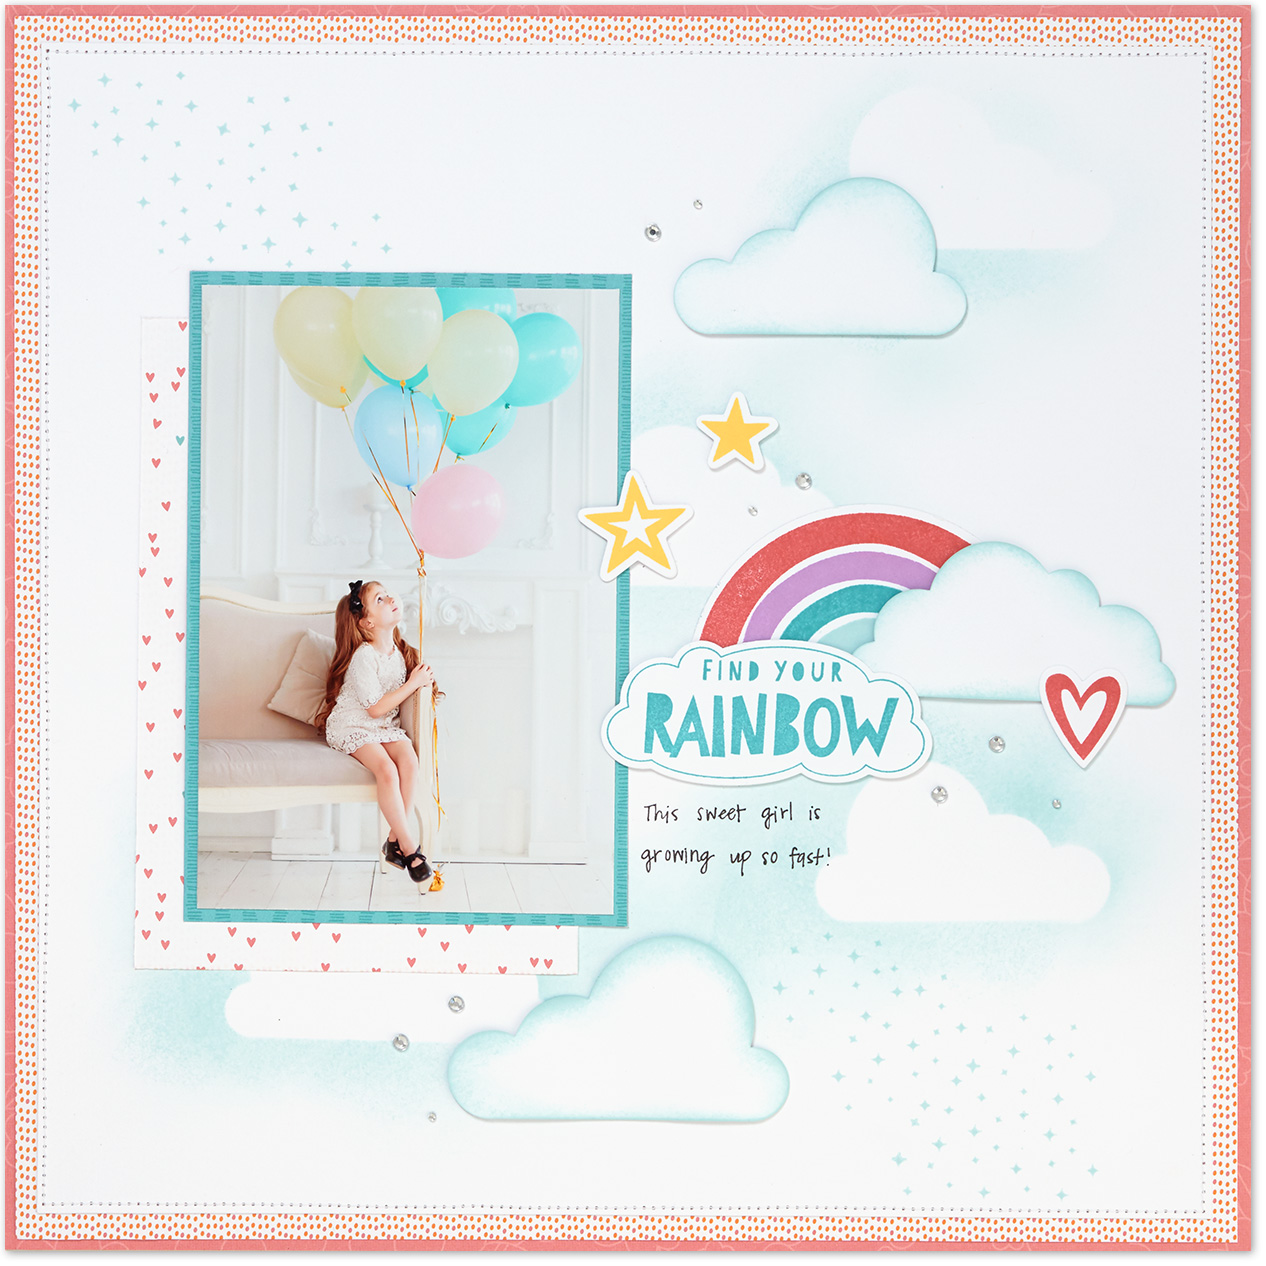
This stenciling technique is a great way to create unique backgrounds for your artwork. For this page, we attached three clouds to the page and sponged around them. After allowing the ink to dry, carefully removing the clouds, and removing any adhesive, we cut three more clouds and sponged around the edges. Then we popped them up with 3-D tape to give the page dimension. The final look sure is dreamy!

You can incorporate multiple colors into your stenciling! Here we used a scalloped piece for our stencil, and then sponged on a rainbow of colors. There are SO many possibilities!
We hope this post has inspired you to try stenciling on your artwork. It really is such a fun way to get in touch with your inner artist!
Which page is your favorite? Tell us in the comments below!
Recipes
12″ x 12″ You Make the World Sweet Page
Z3334 Little Dreamer Scrapbooking Stamp + Thin Cuts, X7219B Little Dreamer Paper Packet, 1385 White Daisy Cardstock, Z2841 Glacier Exclusive Inks™ Stamp Pad, Z2895 Lagoon Exclusive Inks™ Stamp Pad, Z2896 Smoothie Exclusive Inks™ Stamp Pad, X7219C Little Dreamer Complements, Z3321 Little Dreamer Glitter Gems, Z3132 Watercolor Paints, Z697 Round Sponge, Z726 Sponge Daubers, Z3167 Cricut® Artistry Collection
Cricut® Shape:
Artistry
1″ Shift+Background <K> (p. 28)
12″ x 12″ Find Your Rainbow Page
Z3334 Little Dreamer Scrapbooking Stamp + Thin Cuts, X7219B Little Dreamer Paper Packet, 1385 White Daisy Cardstock, Z2841 Glacier Exclusive Inks™ Stamp Pad, Z2895 Lagoon Exclusive Inks™ Stamp Pad, Z2840 Thistle Exclusive Inks™ Stamp Pad, Z2896 Smoothie Exclusive Inks™ Stamp Pad, Z2843 Canary Exclusive Inks™ Stamp Pad, X7219C Little Dreamer Complements, Z3274 Clear Sparkles, Z1263 Bitty Sparkles, Z697 Round Sponge, Z726 Sponge Daubers, Z3167 Cricut® Artistry Collection, Thread, Sewing Machine
Cricut® Shapes:
Artistry
1 ½” and 1 ¾” Icon-2 <Spring> (p. 38)
1 ½” and 1 ¾” Shift+Icon-2 <Spring> (p. 38)
12″ x 12″ Believe in Yourself Page
X7219B Little Dreamer Paper Packet, 1385 White Daisy Cardstock, Z2853 Sweet Leaf Exclusive Inks™ Stamp Pad, Z2843 Canary Exclusive Inks™ Stamp Pad, Z2864 Sorbet Exclusive Inks™ Stamp Pad, Z2896 Smoothie Exclusive Inks™ Stamp Pad, Z2840 Thistle Exclusive Inks™ Stamp Pad, Z2895 Lagoon Exclusive Inks™ Stamp Pad, Z2841 Glacier Exclusive Inks™ Stamp Pad, X7219C Little Dreamer Glitter Gems, Z3189 White & Gold Ribbon, Z697 Round Sponge, Z726 Sponge Daubers, Z3169 Cricut® Artbooking Collection
Cricut® Shape:
Artbooking
8″ Shift+Photo Mat 1 <S> (p. 59)