
September is National Stamping Month and, as you know, we live and
breathe stamps here at Close To My Heart. They are where we got our
start many years ago, and to this day just simply can’t get enough of
them! And from what we can gather, we are not alone in this
obsession hobby!

With care, you place your stamp on your block, prudently ink it with a color that you carefully selected just minutes (
if not days)
before, then press it to your paper and upon removing the block your
image looks as perfectly crisp as you planned for. The next step in the
creation process of this new image is to breathe life into it with some
color.
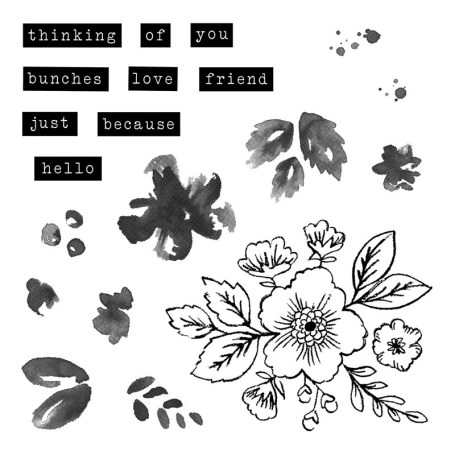
We’ve taken one of our many (
many) favorite stamp sets,
My Acrylix® Bunches of Love, from the
Holiday Expressions catalog
to illustrate some stamp coloring options. Each is unique in it’s own
way and, depending on what you’re looking to achieve, has a place in
your coloring spectrum. For comparison purposes, we’ve kept the mediums
separate, but by all means do combine them in your artwork to make your
images look exactly how you envision them!
First up, the original.
Some of our stamp sets already come with the parts to fill in the white space of a larger image, and the
My Acrylix® Bunches of Love set does just that.
To keep things quick and easy, use the corresponding filler pieces to complete the image.

In cases where the stamp set is not designed this way or you’re
wanting to showcase a stamp differently so it’s not the exact same every
time, continue scrolling through our list.
A Watercolor Look:
watercolor paint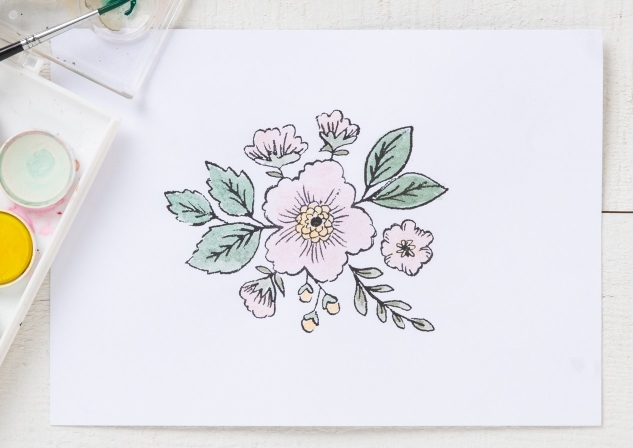
watercolor pencils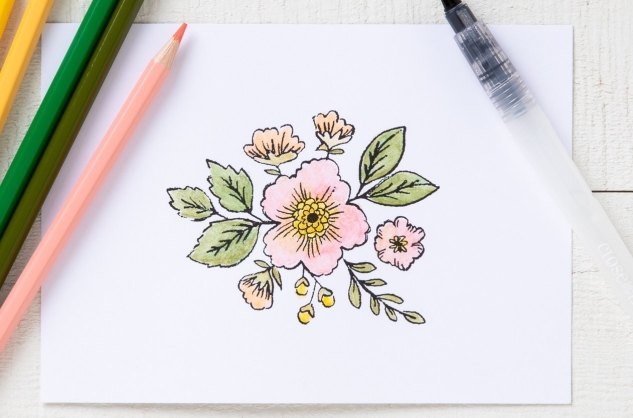
For a soft look, watercolors are the way to go!
If you’re still working on mastering the art of using
watercolor paints, try
watercolor pencils.
By applying color with pencils, shading and color blending is easier to
control than with paint. Once you’ve penciled the color in, gently
brush water over it with a damp fine tip
paintbrush or
waterbrush
to spread the pigment. For best results, follow the pencil lines using
smooth strokes. Keep in mind as you decide which watercolor medium is
right for your project, that the direction of your pencil lines will
still show through, unlike with paint.
Exclusive Inks™
For a more vivid “watercolor” look that doesn’t require layers of watercolor paint to achieve, give “painting” with our
Exclusive Inks™ a try!
Squeeze your stamp pad in the middle to get some of the ink to rub
onto the lid. Remove the inked lid, and from there decide how strong or
light you want your color to appear. If you want the saturation to match
the ink color exactly, use the ink as is. For a lighter variation of
this same color, mix some water in with it (straight on the lid). The
more water you add to the ink, the lighter the color will be. Pick the
color up with a brush and ink-paint your stamped image.
Our
Exclusive Inks™
are available in every one of our 41 exclusive colors (plus White Daisy
and several black options). Enjoy effortless color coordination with
our patterned papers, cardstock, and embellishments by using this method
for coloring in your stamped images.
Pens:
ShinHan™ Touch Twin markers
When going for a saturated, vibrant look, especially in small details,
ShinHan™ Touch Twin markers
are an excellent choice. They are bright, smudge-proof, and, because
they are alcohol-based, they are easy to blend. The fine tip on each
marker is ideal for coloring and adding intricate details.
shimmer brushes
Until recently, the
shimmer brush
was considered mostly an accenting tool because it only came in clear
and gold. Well, those days are over friends! Now also available in
Sugarplum,
red,
black, and
Mint,
these new hues carry enough weight to be used on their own to add a
little bit more than shimmer. When you use these, prep your brush before
you do. You will want to squeeze your brush over scrap paper until the
shimmery liquid comes out. Brush it on your scrap paper until you get
the consistency you want on your brush before coloring in those details.
Heat Embossing:
Give your stamps a little lift and texture with the right inks and
embossing powders. (For those of you who are new to this technique,
embossing powder is a special powder that, when heated, melts to form a
raised surface.)
VersaMark™ ink and embossing powder
Sometimes a flat image just isn’t the way to go. That’s when heat
embossing comes to the rescue. To start, stamp your image with the
VersaMark™ ink pad (embossing ink), which will create a clear, wet-looking print of your stamp. While the ink is still wet, cover it with
embossing powder and carefully shake off any excess. Use a
heat tool
to dry and seal your design. The heat tool blows extremely hot air with
a low air current, which keeps the powder from blowing right off—hair
dryers are
not a good substitute! We have several new embossing
powders in our new Holiday Expressions catalog to choose from (for a
complete list
click here).
Pigment Exclusive Inks™
Okay, so we’ve shared this last idea on here before, but with our new large stamp pad-sized
pigment inks added to our coloring repertoire, we just have to share again.
Did you know that you can pair any of our
Exclusive Inks™ pigment pads with
clear embossing powder
to emboss in that exact color? Yes, really! Stamp an image with your
choice pigment ink, cover it with clear embossing powder, and then set
it with your heat tool! It’s that easy! Match our exclusive colors
perfectly using this last technique!
Whether you use these stamp coloring ideas alone or mix and match
them, we hope you enjoy a full spectrum of color in all of your stamping
projects!
Happy stamping!


